6. Advanced Features
Advanced Features
3. Effective usage of Markers.
1. How to share projects.
A Taseditor project is saved to disk as an .fm3 file. All essential aspects of the work process are saved into this file, making it possible to restore the postponed work in its exact state. The size of such "instant snapshot" may be pretty huge (depending on the Greenzone size, it may take hundreds of megabytes).
When you want to publish your project in the Internet (for example, as a TASVideos submission), it's better to share only the most important information, but not the whole snapshot of your working process. To do that, choose File -> Save Compact in Taseditor's main menu. The "Save Compact" window will appear, prompting you to select which aspects you want to save to the new FM3 file.
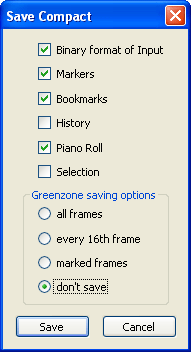
Binary format of Input – save movie Input in binary form. This option is related to fm2 format, which is the base of the fm3 format. If you uncheck it, Input will be saved to the fm3 file in text format, which will increase file size but leave the possibility to edit it in any text editor. However, Taseditor is much better suited for editing movies, so it's recommended to keep that checkbox set, and avoid changing FM3 projects outside Taseditor. Anyway, in non-compact fm3 projects (saved regular way) Input is always stored in binary.
Markers – save Markers to the file. The movie Input is always saved to fm3 file, because without it emulator won't be able to open fm3 files. But without Markers the movie replay is still possible, so you can uncheck the checkbox if you don't want to share them. Although this way your fm3 won't differ much from an fm2 movie, so it's recommended to leave that checkbox checked, to share all current Markers and their Notes in the compact project. The file size will increase insignificantly.
Bookmarks – save all Bookmarks and their branches data to the file. It's recommended to leave this option checked. The file size will increase insignificantly.
History – save History Log to the file. The file size will increase by several megabytes. Usually there's no need to publish the data. So it's recommended to uncheck this option. When you open an fm3 project with no History Log, Taseditor creates a new History automatically.
Piano Roll – save current position of vertical scrolling of the Piano Roll, in order to see the exact segment of the movie after loading the compact fm3 file. The file size will increase insignificantly, so you may keep that option checked.
Selection – save all Selection data to the file. Both current Selection and whole Selection History is saved. The file size will increase insignificantly, but usually there's no need to publish the data. So it's recommended to uncheck this option.
Greenzone saving options – here you can choose how the Greenzone should be saved. Greenzone is the main factor causing huge project file size. So it's recommended to choose partial saving or not save the Greenzone at all.
- all frames – save entire Greenzone. The file size will increase dramatically!
- every 16th frame – save only every 16th frame. The file size will increase dramatically.
- marked frames – save only marked frames. The file size will increase depending on the number of Markers in your project.
- don't save – the Greenzone will not be saved. If during the compact saving the Playback cursor is at the very first frame of the movie, there will be no single Greenzone savestate in the fm3 project. But if the cursor was left at some frame in the middle of the movie, the compact fm3 will contain one Greenzone savestate, allowing to restore the emulator state on the Playback cursor frame when you open the project. Since one savestate uses very little disk space, the file is still compact.
Using compact saving you can get an fm3 project being less than 500KB in size, while still sharing all essential data the recipient may need. For example, if you are working in co-authorship with another TASer(s), you will need to share not only Input, but also Markers and Bookmarks. As for the Greenzone, the recipient can recreate it by replaying the project movie in Taseditor.
On compact saving, your project name receives the "-compact" suffix. Compact saving doesn't replace normal project saving, so if you have any unsaved changes in the project, the asterisk in the window caption will not disappear after Save Compact.
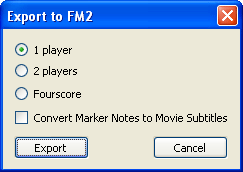
Besides saving a compact fm3 you can also export movie data to fm2 format, accepted at TASVideos before Taseditor even existed. But in such files you will share only Input. To do that, choose File -> Export to FM2 in Taseditor's main menu. The "Export to FM2" window will appear, prompting you to choose target movie type (1P, 2P, Fourscore).
Since FM2 format also supports text subtitles, you can use existing Marker Notes as a source for generating movie subtitles. For that, enable the "Convert Marker Notes to Movie Subtitles" checkbox. Then while watching the fm2 file the viewers will see text messages appearing when passing certain frames (the frames where your project had Markers at). If necessary, you can then convert those fm2 subtitles into the commonly used .srt format to post the TAS on Youtube. To do that, right-click the FCEUX window while replaying the subtitled movie and choose "Dump Subtitles to SRT file" command.
FM2 files can be opened in Taseditor similarly to loading fm3 projects. In the "Open TAS Editor Project" window (File -> Open) switch to the filter "All Files (*.*)" and then choose your fm2 movie file. Taseditor will bring the message box saying that this is not a project file, and will ask confirmation. After you click "Yes" it will create new project using Input and settings from the fm2 file.
Also, you can import Input from any fm2 or fm3 file using File -> Import Input. This time no new project will be created, but Input of current project will be replaced with Input from the file. This operation is very similar to pasting Input from the Clipboard, it is registered in History Log and can be undone by Ctrl + Z.
2. Patterns usage.
When editing Input, TASer actually creates a unique sequence of presses and releases for every button of joypad. But, despite the uniqueness, this large sequence still contains many typical segments, which are are short sequences of presses and releases that repeat many times in succession, or appear many times in different places of the movie.
To speed up the work, you can remember the most typical or frequent sequences as patterns, to be able to put them with a couple of clicks, not drawing every single buttonpress manually each time.
Patterns are useful in several cases:
- when one sequence is frequently used in the movie (for example, an accurate alternation of pressing and releasing the B button)
- when you need the same sequence for several buttons (for example, alternating L and R)
- when a certain sequence needs to be drawn (or redrawn) many times (for example, making a running start by tapping R twice)
Some of the most obvious patterns are already added by author. To add your own pattern you need to edit the taseditor_patterns.txt file in any text editor (like Notepad), this file is stored in /tools subfolder of FCEUX main folder. Every second line in this file constitutes an encoded sequence of button states. The code is straightforward: "button pressed" is encoded by 1, "button released" – by 0.
Every pattern is looped, which means, when a long sequence of Input is created using a short pattern, the pattern is repeated the necessary amount of times to fill the whole given interval.
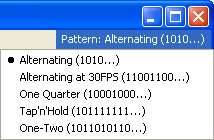
After adding or editing the patterns file, restart Taseditor to reread the file changes. The list of all available patterns is always in the upper right corner of the TAS Editor window. To change the current pattern, enter that menu and click the needed pattern name. For easy orientation in patterns it's recommended to call each pattern by a distinct name that reflects its in-game meaning.
To apply current pattern, Taseditor needs to know the beginning and the end of the interval where the chosen button is going to be pressed and released according to the rule. There are 3 different ways to apply a pattern:
Example 1. Point and click the start frame (click in any Piano Roll column except the icons column), thus selecting that frame. Then hold the Alt key and left-click the end frame in the column of the button you are editing. In the interval between those two frames you will get the needed sequence of the chosen button presses. This method is rather handy when the start frame is already selected by previous clicks in Piano Roll, and you only need to to hold down Alt and click the end frame.
Example 2. Left-click the start frame in the column of the button you are editing, and hold the mouse button to start drawing. Hold Alt and move the mouse cursor up or down. This way you will be drawing the pattern sequence of buttonpresses.
Example 3. Select a range of frames, then hold Alt and left-click on the edited button symbol in the Piano Roll Header. The pattern will be applied to the selected area.
When using traditional method of TASing you are also able to apply patterns to recorded sequences, although in a less convenient manner. To do that you should set the "Use pattern" checkbox on Recorder panel. Before that you may want to record the buttons you don't need to alternate (record them without using patterns), and then record the needed button(s) with pattern, using the "Superimpose" function for the segment.
For example, you need to record a burst of fire while jumping over the pit. At first, record that jump without shooting, then return the Playback cursor to the beginning of the segment (by jumping to the Bookmark left here), check "Superimpose" and "Use pattern", hold the B button and unpause the emulation. You'll see how the shooting Input superimposes over jump Input.
Before Taseditor there was the "Autofire" concept similar to patterns. But due to inconveniences of the Recording method that feature was rarely used, because when you are typing Input it's usually easier to press and release the needed buttons manually. So if you stick to traditional method of TASing, you won't likely use patterns. But in the non-linear or semi-automatic TASing, patterns are drawn as quickly as regular buttonpresses, so that's where they can really speed up the work.
Patterns are used when creating sequences for a single button. But when you want to use a typical macro involving several buttons, use Copy/Paste.
3. Effective usage of Markers.
Markers exist to simplify complicated situations by structurizing the problem. When the game requires you to perform (or think over) several complex actions, you should break the large segment into separate intervals, in order to understand clearly where one action stops and another one starts. Even if the initial subdividing appears to be wrong, it still helps you to get thoughts in order.
Obviously, you are not expected to set Markers on commonplace segments, most of which aren't even polished (e.g. where it's enough to hold R to win). But key moments and memorable situations of the movie should be marked and commented with Notes. It will help you to keep the whole picture of the project in mind and navigate the movie by text.
No need to write works of literature inside the Notes. You may just confine yourself with simple label words, numbers, tags. Invent the words on the fly, but try to keep systematic approach. As in, if at the beginning of the first level (on the transition screen) you've set a Marker with the Note "level 1 start", you should also write "level 2 start" at the beginning of the second level, and not "act II begin" or something. During the creation of TAS you naturally form a unique glossary in your mind using various terms that are topical for that specific game. And the more systematic approach you apply to writing the Notes, the easier it will be to describe another (similar) segment and understand its task. The easier it'll be to find similar Input segments, recalling only their vague in-game appearance.
The tasks you meet in video games are often repeatable. Details and environment may be different, but player actions remain more or less the same. In some cases you can just copy the Input (solution of the similar task) from the previous level, and it will successfully sync with the new in-game situation (probably after a little adjustment). Though, after the copy/paste it's recommended to diversify the Input to prevent the TAS viewers from noticing the repetition and getting bored.
For example, at the beginning of many levels in Super Mario Bros you need to use the same button sequence to accelerate to maximum speed optimally. Let's imagine, you are honestly commenting Input during TASing. Then in World 1-1 in the acceleration section you probably left a Note with words like "acceleration" or similar. Now, when you start creating Input for a segment with that task again, in a new level you put a Marker at the beginning of the segment and write a Note, describing your current task. Obviously enough, you are going to use the word "acceleration" there as well, because you need to accelerate.

And that's where you can use Taseditor's function of automatic searching for similar Notes. Leave the Playback cursor inside the current segment and press the "Similar" button at the bottom of the Toolbox. The Selection cursor will instantly jump to the Marker that contains the most resembling Note, in Taseditor's opinion. Most likely, it will be the Marker left at the beginning of the acceleration segment in the World 1-1. Therefore you can instantly select all Input in that segment by pressing Ctrl + A, then copy the Input to the Clipboard (Ctrl + C), return to the current segment (press Shift twice) and paste from the Clipboard (Ctrl + V).
If the first search result doesn't bring you to the intended segment, you can press the "More" button to try next result of the search. Usually the right segment is among the first offered finds, granted that you marked the segment with a sensible Note.
Interesting fact: while writing the Note for the second appearance of the acceleration segment, you use the word "acceleration" without an intent to correlate to previous cases, but only according to the in-game situation. So you are not expected to actually remember the text of old Notes. The right words will come to your mind in the right time.
This way, right during the TASing process you form a library of useful Input combinations, not unlike the pattern list described above, except that you don't have to purposely prepare the button sequences – they appear natural way during the segments shaping and optimization, and they are stored inside the movie, not in an external file. And when you improve a combination for some segment (e.g. find a faster way to accelerate), you can easily find and fix all related segments with similar button sequence. Also, here you don't have to remember the exact description or the name of the needed sequence, because, if you use systematic approach to describe tasks, the words will partially match (and a perfect match is not required, since the searching algorithm is rather smart).
The auto-search is also useful when you need to jump between two (or more) related segments, located far from each other in the movie. Scrolling the Piano Roll with the mouse wheel or jumping through dozens of Markers from one segment to another is not as handy as clicking the "Similar" or "More" button. To let the algorithm instantly find the twin segment (or the source segment and the destination segment), consider using some unique word in their Notes, one that isn't used in other places of the movie.
For example, in the "Megaman" game each robot master must be beaten twice (second time it's in the end of the game). It's logical to suppose that both battles will be entitled by Marker Notes containing the name of the robot and the word "boss" or "fight", or something like that. As a result, when the Playback cursor is in one of those 2 places, pressing the "Similar" button will get you to another one.
In this example the proper words for the Notes text are no-brainer, yet they are unique enough not to repeat in other places (at least not in that combination), so the auto-search will work perfectly. In a different case you may have to invent a unique label, but usually the first description you think of is enough.
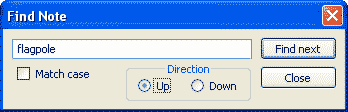
You can also use standard search for Note text. For example, it's common to leave a Note beginning with the "TODO" word at some places where you are not sure the best solution is found (the segment Input is optimal). So, when you have mood to make fixes, you could skim through all Markers with that tag by bringing the "Find Note" window (Ctrl + F) and typing the word "TODO" to search for.
If you don't like all these big ideas with Markers, you can TAS without them. After all, many games provide rather simple tasks for a TASer, they don't require a highly organized approach to the solving process. If the problem can be solved on impulse, don't spend time on preparation and fortification. Markers provide advantages only in long-term goals.
So, just like in programming, in most cases you can successfully write the so-called "dirty code" (here it would be a project without Markers and Notes) that is fast to create, but hard to maintain and extend. Or you can make a lovingly formatted project which is nice to watch and modify. Since TASers have to modify their movies very often (in order to beat previous records), the today's time costs for the project formatting are likely to be repaid by the fact that the looks of the project motivate to continue the work on it.
4. Lua usage.
With the Lua language you can write scripts that can be executed by FCEUX along with game emulation. Writing scripts requires minimal programming skill, while the range of possibilities is pretty huge. You can create your own TAS tools, modify the game at the time of execution, have access to images and sound on the fly, send data via network or record it to disk, etc. And you can make custom extensions for TAS Editor.
To master the Lua language completely you would need to read its documentation and gain actual experience, but for making simple scripts it should be enough to read this Manual and the Lua chapter in FCEUX docs. At first, try to run scripts created for FCEUX by various people. They are stored in the /luaScripts subfolder. Each script is a text file with .lua extension, such file may be created and modified in any text editor. Before running scripts you need to open some game ROM in FCEUX. To run a script, open the Lua console (File -> Lua -> New Lua Script Window), in this window press the "Browse" button and load the script file, then press "Run". If emulator is paused, either unpause it or advance a frame to activate the script. As for the Lua console, the window may be hidden or minimized.
Program code in Lua scripts for FCEUX usually consists of 2 parts: the first part is executed once the script is activated, another part runs on certain emulation events, such as the end of a frame emulation, loading a savestate and so on.
The first part, which runs on script activation, is usually executed only once (unless you made an infinite loop in it). The code is executed line by line, from top to down. Usually the task of that part is to initialize global variables and register functions to be launched by FCEUX when certain events occur.
In most of cases the main code of the script is contained in the single function that is automatically executed at the end of every frame. For example, this is how Mario hitbox drawing code for SMB may look:
|
marioWidth = 16 marioHeight = 32 function everyframe() marioX = memory.readbyte(0x3AD) marioY = memory.readbyte(0xCE) gui.drawbox(marioX, marioY, marioX + marioWidth, marioY + marioHeight) end emu.registerafter(everyframe) |
When activating this script, FCEUX creates and initializes two variables ("marioWidth" and "marioHeight"), then registers the function called everyframe() to the "frame end" event (registerafter). After that the text ends and the script finishes its execution, but the registered function remains in emulator memory, and if you unpause it or press Frame Advance, after every frame it will run the code stored within the everyframe() function. That code consists of 3 lines. The first two create variables for the hitbox position and initialize them with current values from RAM of the emulated console. The third line draws graphics over the game picture output.
Actual RAM addresses can be found in public resources (like http://tasvideos.org/GameResources/NES/SuperMarioBros.html) or found on your own using the Cheat Search tool or the RAM Search tool built in FCEUX. In this case we know that Mario's X position is stored in memory address 0x3AD, and his Y position is in 0xCE. So, the script just takes their current values and draws the rectangle in the corresponding screen position. Sometimes there's need to recalculate the values to translate the in-game world coordinates into on-screen coordinates, but in this case they match.
The standard functions readbyte(), drawbox() and other useful functions are described in the FCEUX documentation. It also describes how to use mathematical expressions and make loops and conditions.
The standard functions available only when Taseditor is engaged are listed in the Reference. Using all this knowledge you can not only draw and write messages over the emulator screen, but also control Playback and Selection, and most importantly, modify the movie Input and Markers.
For example, this code copies one joypad Input to the second one's place:
|
function doCopy() selection_table = taseditor.getselection() if (selection_table ~= nil) then for i = 1, #selection_table do selected_frame = selection_table[i] joypad1data = taseditor.getinput(selected_frame, 1) taseditor.submitinputchange(selected_frame, 2, joypad1data) end taseditor.applyinputchanges("Copy 1P->2P") end end taseditor.registermanual(doCopy, "Copy 1P to 2P") |
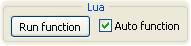
When launching this script, FCEUX registers the doCopy() function to the event of pressing the "Run function" button (registermanual). Now any click on the button will run the code of that function, consisting of 9 lines. At first, the function gets information about Selection from Taseditor, and if it's not blank (i.e. at least one frame is selected in the Piano Roll) it runs the FOR loop, going through all the selected frames from the first to the last. For each selected frame the function requests the Input of the first player from Taseditor (and stores this data to the "joypad1data" variable), then it submits the claim to change the second player Input for that frame. All these submissions are accumulated in Taseditor memory until the FOR loop ends, after that they all are applied by calling the applyinputchanges(). As a result, the second joypad in the selected range of frames contains the same Input as the first joypad.
This simple script is already a useful mini-tool that may be needed when making a TAS for 2 or more players. Launch it, and while TASing you will be able to select a range of frames in the Piano Roll and click the "Copy 1P to 2P" button (or press the "Run Manual Lua function" hotkey) to synchronize both players. Every time the script work results in an Input change, the Greenzone is automatically truncated, and a new item is added to the History Log, allowing you to undo the changes done by the script. This way you've got a feature completely integrated into Taseditor, and you've programmed the behavior of the feature yourself.
Even though you can successfully TAS without Lua knowledge, its support can save you much time and even hint on a less obvious solutions during the Input optimization (or more exactly, during the game Output analysis).
Videogames often hide important details of the situation, and TASer has to watch memory state directly in order to know for sure what's going on and to precisely perceive the optimality factors while polishing segments.
For example, many games don't show boss HP on screen. So, to know exactly the damage you inflict, you need to watch the numeric value of the corresponding RAM address in the Memory Watch window. And when there is a plenty of hidden factors (for example, several timers of invulnerability and boss attack, and some special counters of the player character), TASer needs to watch and analyze many memory addresses as they change according to different rules. In this case an on-screen visualization of some data would be huge helper. For example, boss HP can be displayed as a bar or a number above his head, and a red color can indicate the damage frames or other events. As a result, your mind is relieved by moving from deciphering an abstract data format to the format that instantly delivers the main idea (e.g. "the boss was damaged", "good/bad").
So it's recommended to learn Lua at least to the level of being able to sensibly modify others' scripts. For the long time FCEUX existed, people wrote and published a lot of scripts serving for various purposes, and you'll probably only need to change some RAM addresses to adjust a script to your game. Oftentimes it also makes sense to ask for help at TASVideos forums.
The Taseditor guide is over. If you were reading carefully, you should now know everything necessary to make a TAS up to the high standards of TASVideos. The only thing left is to gain an experience in real work, master some actions to automatism in order to feel no trace of routine and have fun from the process of armed playthrough and investigation of games.
Created with the Personal Edition of HelpNDoc: Free CHM Help documentation generator