2.1. Piano Roll
Piano Roll
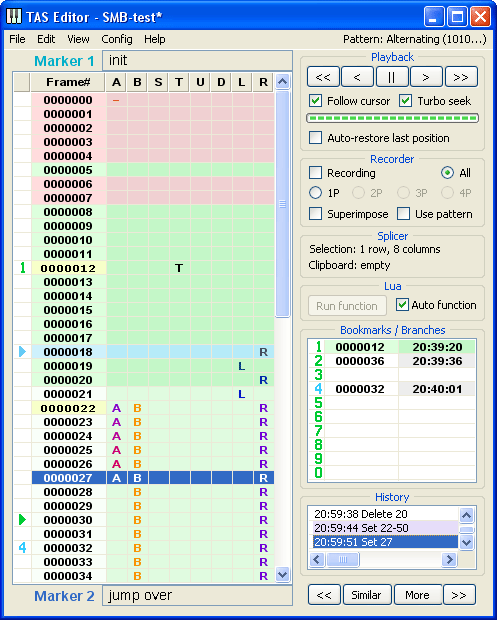
Taseditor's workspace is similar to the interface found in many music-sequencing programs. Piano Roll is a table containing the most necessary data about the edited project. Users can both observe that data and edit it by mouse clicks on various cells of the table.
If you just opened the Taseditor window you will most likely see an empty project that contains only the starting (zeroth) frame of the movie. So, before you begin any experiments, you should temporarily unpause the emulator to let the movie reach at least the title screen of the game, the point where players can already affect the game with buttons Input. By default the hotkey to pause/unpause emulator is the Pause key on the keyboard, but in Taseditor you can use middle mouse button (the wheel) instead. Try watching the running game for a couple of seconds, then again press the Pause key or make the middle-click (anywhere) to stop emulation.
During the emulation, Piano Roll contents become filled with the information about the processed frames. Each line in the Piano Roll list is responsible for a single frame. The index number of the frame is shown at the beginning of the line, the numeration goes top-down. When the window size is not enough to display all the frames, the list gets a vertical scrollbar.
By the color of each line you can tell the following data about the corresponding frame:
- Pale (almost white) lines stand for frames that are outside of the Greenzone. This means that the emulator haven't processed these frames yet and thus it knows nothing about them. For example, if you import some finished movie into Taseditor, at first Piano Roll will display all frames in whitish colors, before running through them. In the above picture such lines begin from the frame 21, because the Greenzone ends at the frame 20.
- Green and red lines mean that those frames are contained in the Greenzone, the emulator has already played back that part of the movie, and you've already seen on the FCEUX screen what happens with the game during these frames. Lag frames are marked red, otherwise there's no difference between red and green lines.
- The light-blue line (frame 18 on the picture) shows the currently emulated frame. Events of the frame are displayed on the FCEUX screen at the moment. This is always a sole line. In this Manual we will call it the Playback cursor. When emulator is paused, the Playback cursor stays at the same frame, and while emulation the cursor runs down, leaving the trail of green and red Greenzone frames behind. You can put the Playback cursor at any frame of the movie to see the game events of that frame. To do that, click the very left column of the Piano Roll (the column where the blue triangle pointer travels down) in the line you wish to observe – the blue pointer will jump to the chosen line along with the Playback cursor, and the FCEUX window will update accordingly, showing the in-game state of the frame. Now, if you don't let go of the left mouse button, you can drag the light-blue cursor up and down.
- The dark-blue line highlights the selected movie segment. The actual color may differ depending on your Windows settings (the Visual theme chosen). Piano Roll lines become selected as you left-click on them. In the above picture the single frame 27 is selected, but you can select any number of frames. To select a range of frames, click on the number of the first frame and stretch the selection by dragging the mouse up or down. Note: Piano Roll lines will also be selected by clicking on the Input (i.e. almost any other column), but the column with frame numbers is specifically dedicated to working with the Selection. In this Manual we will call all dark-blue lines the Selection, and a single selected line will be called the Selection cursor. Unlike the Playback cursor, the Selection cursor isn't tied to the game state. To totally remove the Selection you could right-click the number of a selected frame and choose "Deselect" in the context menu, but usually there's no need to remove the Selection left from previous operations with the movie, because the next operation will automatically bring the Selection cursor to a new place.
- A purple line appears for a brief moment when you use the Undo feature. This way the program shows you the exact place of the reverted changes. A huge convenience of Taseditor is that absolutely any change can be reverted with the standard key combination Ctrl + Z, so don't be afraid to experiment.
To start adding and changing the movie Input, click cells of those columns to the right from the column with frame numbers. If you click an empty cell, a symbol corresponding to the real joypad button will appear there.
|
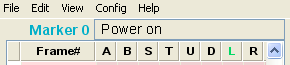
A – A button B – B button S – Select button T – Start button U – D-pad Up D – D-pad Down L – D-pad Left R – D-pad Right |
|
If you click on an occupied cell, it will become cleared, and the corresponding button will be considered released on that frame. There is no other button states except these two: either pressed or released.
At first it might not be very trivial to correlate these 8 symbols with plastic buttons of a real joypad, but try pressing the first player input keys (set in your emulator) while you are in Taseditor. As you tap the buttons, the corresponding letters will flash in the Piano Roll Header, and you can easily associate the columns with buttons.
When working in Taseditor, the most of time is spent on that very process of setting and removing buttons at different frames. This way you form the sequence of button states, which is then fed to the game and reflected by actions of the game character(s). For example, if you put the letter "A" to a chosen Piano Roll cell at the middle of Super Mario Bros gameplay, Mario will perform a low jump, because a short A button press occurred in the movie. And if you set several "A" symbols in a row (vertically), Mario will do a high jump, because A was held longer.
Every time you change the Input above the line with the Playback cursor, the light-blue cursor steps back (up in the Piano Roll) also clearing some part of the Greenzone. This happens because the change of Input leads to a change in the game events, so the game data memorized inside the Greenzone becomes irrelevant. Thus after you change Input you need to replay some frames of the movie again – either by unpausing the emulator, or by manually dragging the Playback cursor to the frame of interest – and you will see results of the latest Input changes on FCEUX screen (and also restore a part of the Greenzone).
Besides, you can hold the right mouse button and roll the mouse wheel down to move the Playback cursor to the needed frame manually. Wheel-based navigation is the most responsive way to observe a little segment of the movie. You may use a single hand, and the mouse pointer may be anywhere, e.g. it may be left over the edited Input cells. Try this method, it's a very effective way to rewind back and forth. Just hold the right mouse button with one finger and roll the wheel with another finger while looking at the FCEUX window.
In addition to single cell clicks, you can also change button states in many frames at once. For instance, if you want the R button (Right) to be pressed for 20 straight frames, you don't have to click all 20 cells. You can just click on one of them, hold the left mouse button and move the mouse cursor up or down – it will leave a trail of symbols, thus you will draw a vertical row of buttonpresses. Similarly, you can quickly erase a row of symbols by clicking the first one and moving the eraser up or down. As you may notice, erasing starts when you click an occupied cell, and drawing starts when you click an empty cell.
Moreover, you can hold the Shift key before clicking on the Input to spread the effect of the click across all frames between the point of click and the Selection cursor. For example, you can set "R" in the first frame, then scroll the Piano Roll to the end, hold Shift and set "R" in the last frame – the R button press will appear in all frames.
There's one more way to mass set or mass remove buttonpresses. First, select several frames, for example, the 5th, the 10th and the 20th (to do it you have to hold Ctrl while clicking on numbers 0000005, 0000010 and 0000020). Then click on the "L" letter in the Piano Roll Header. If the selected frames didn't have the Left button symbols, they will get it. And if all of the frames had the Left button already pressed, the click will clear it.
Later you will find a few other ways to edit the Input, but these were the main ones. At first it might look unnatural to draw buttonpresses with the mouse instead of simulating them using keyboard keys. But this discomfort feeling will disappear soon after you devote a few days to Taseditor.
When drawing the Input you've probably noticed that previously drawn letters have different color, and as you add new buttonpresses the old letters change their color from orange to violet and blue, eventually becoming standard black. This is one of experimental features of Taseditor, called "Hot Changes". It was invented to unobtrusively increase TASer's awareness about recent changes. Every time you modify the Input, the latest buttonpresses receive the hottest color (bright orange), and all the previous edits cool down by one level, becoming less bright.
Because of the coloring, even a cursory glance on the Piano Roll is enough to get the idea which buttonpresses were added just recently and which were set long ago. Also, you can see which of them were recently removed (they are replaced with a dash).
If you don't like this feature, you can disable it, but within this Guide we'll imply that you have the "Hot Changes" enabled.
The narrow column to the left from the column with frame numbers is not just for dragging the Playback cursor. It also displays various informational icons. The blue arrow pointer always points to the frame where the Playback cursor is now. The green arrow pointer shows where the Playback cursor was before the Input above it has changed. And the digit cards in this column indicate Bookmarks, they will be described later.
The yellow marks on the numbers of some frames (frames 12 and 22 on the above picture) are called Markers. Besides the yellow color, they can be recognized by the wide font of the frame number.
Markers are meant to facilitate the movie navigation and improve TASer's self-organization. You decide how to use them on your own: whether to put them at the beginning of each level or to mark every jump, shot or any in-game event. Essentially, by setting Markers you logically break your movie down into sections, and then you can cross the movie not just by jumping from frame to frame, but from section to section. This allows you to interpret the movie on a higher level of abstraction.
Such structuring helps to keep a precise image of the entire movie in mind. That kind of an image exists in each TASer's mind, but usually it's rather fuzzy – we remember a rough sequence of the evens, but omit the details (because most of time they are insignificant). When TASer turns emulator off, the image starts to gradually become vague and forgotten. Thus at the next session one needs to re-watch his own movie from the beginning in order to refresh memories, figure key events, arrange priorities and, in general, mentally prepare for resumption of TASing. Sometimes this is needed even more often – depending on the complexity of the TAS. That's why it's recommended to consolidate that image by setting real Markers, not just in your mind but in actual movie.
A Marker can be set at any frame. Unlike the Input, Markers don't affect the game events. There are several ways to set Markers:
Example 1. Double-click on a frame number. If there was no Marker at this frame, it will appear there. If the Marker already exists, you can drag it while the left button is still held after the double-click. This way you can move any Marker to a different frame or simply dump it outside the Piano Roll, thus removing it from the movie.
Example 2. Select one or several frames by clicking the frame number(s), then click the "Frame#" label in the Piano Roll Header. If some of the selected frames didn't have Markers, they will all become marked. If all of them were already marked, all the Markers will be removed. This way you may mass set or mass remove Markers the same way as Input.
Example 3. Select one or several frames in the Piano Roll, right-click on any of the selected frame numbers and choose "Set Markers" or "Remove Markers" in the context menu. This is the slowest way, so the other two are more preferred.
Any Marker operation may be undone (Ctrl + Z) anytime, just like any Input operation.
Markers are automatically numbered by the order they are located in the movie – top-down from first to last. In the upper left corner of TAS Editor window you can see the number of the Marker that is located just above the Playback cursor in the movie (light-blue "Marker #" label). This label both informs you and serves as a button for auto-scrolling. E.g. if you left the Playback cursor in one part of the movie and scrolled the Piano Roll far from that point, you can immediately return to the light-blue cursor anytime by clicking the "Marker" label (or tapping the Shift key twice). You are definitely going to need this feature when editing large movies.
A similar button can be found in the lower left corner of Taseditor. The "Marker #" label of a dark blue color (the same color as the Selection cursor) displays the number of the Marker located just above the Selection. If you click this label, the Piano Roll will automatically jump to Selection. This button is going to be used as often as the upper one. Its keyboard alternative is tapping the Ctrl key twice.
It should be easy to remember that the Shift key is almost always used to control the Playback cursor, while the Ctrl key is to control the Selection cursor.
If both Playback and Selection cursors are under the same Marker, the numbers in both corners will obviously be the same.
Markers can do more than just divide the movie into logical parts. They may also contain text records (comments and work notes). The Marker Note is displayed right near its number. The upper edit field contains the Note of the Marker above the Playback Cursor, and the lower field shows the Note of the Marker above the Selection cursor.
By default, every new Marker contains an empty Note. When you create a new Marker by double-click, the lower edit field automatically becomes active, because the Selection cursor points to the just marked frame. So you may quickly type any text for the Note of that Marker and then resume your work with the movie. Text changes are saved automatically.
You can edit an old Marker Note in any of the following ways:
- Put the Selection cursor to that frame and click the lower edit field to activate it.
- Simply double-click on the Marker, and the lower edit field will activate automatically.
- Put the Playback cursor to that frame and click the upper edit field to activate it.
When typing a Note, press Enter or just click any unrelated element of TAS Editor window to finish editing. If you changed your mind, press Esc to cancel the editing. All the controls when editing Notes are listed in the Reference.
It is recommended to enter Notes when creating Markers, so you won't forget why the Marker was set there. This won't take much time if you set Markers by double-clicks and type laconic messages at the same second.
Proceed to the Toolbox description
Created with the Personal Edition of HelpNDoc: Generate Kindle eBooks with ease